
MxCAD Advanced Practical Combat: From "Viewing Drawings" to "Editing Drawings"
In the field of Web CAD development, merely being able to "view drawings" is often insufficient. The display of drawings, panning and zooming of views, these functions form the "read-only" foundation of a CAD system. However, the soul of CAD lies in "design" and "modification". To achieve a qualitative change from being an "observer" to an "operator", mastering the graphic selection mechanism, geometric transformation principles, and grip interaction technology is an inevitable path.
Based on MxCAD's powerful underlying API, we will delve into how to precisely control graphic entities through code, realizing everything from simple movement and rotation to complex batch filtering and transformation. This is not just a pile of functions, but a deep understanding of the underlying logic of CAD graphic data.
I. Precise Positioning: Building Graphic Selection
Before performing any editing operations, we must first determine "who to operate on". MxCAD provides an extremely flexible MxCADSelectionSet mechanism, which, combined with the MxCADUtilityClass drawing tool class, can realize everything from simple point selection to complex attribute filtering.
1. Opening the Door to Interaction: Environment Configuration
Before starting coding, we need to "awaken" CAD's interactive capabilities during the project initialization phase. This step is crucial, as it determines whether users can interact with graphics through the mouse.
Through the MxFun.setIniset configuration, we mainly enable three core switches:
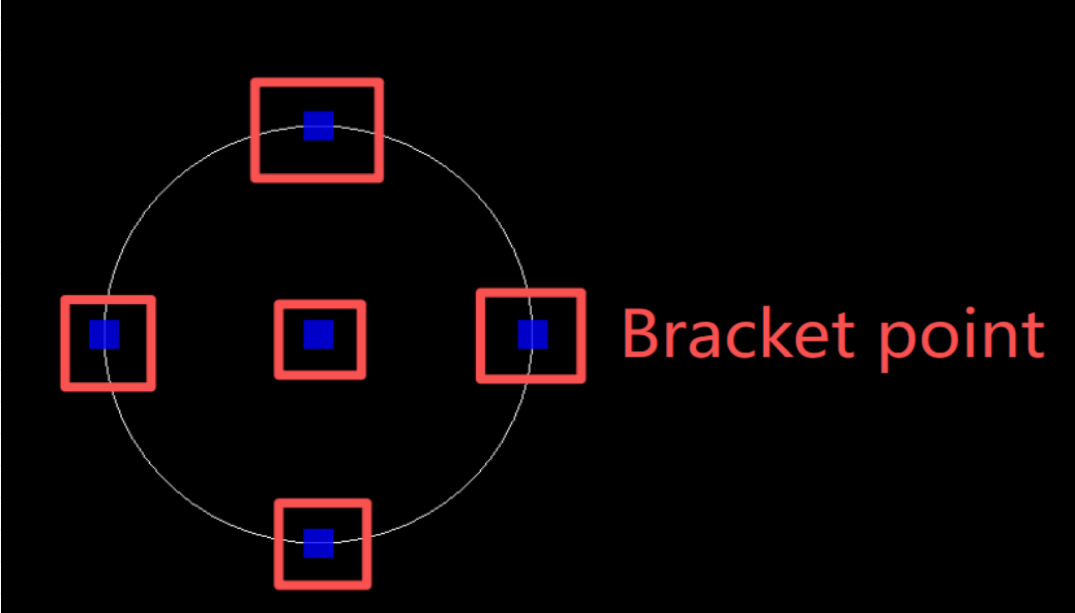
EnableGripEdit: Enable the grip editing system variable. This is a unique interactive method of CAD; when enabled, selected graphics will display small blue squares (grips), and users can directly drag to modify them.multipleSelect: Activate the multi-selection function. Allows users to operate multiple entities through window selection or cumulative selection.IntelliSelectType: Intelligent selection type. Setting it to 2 means supporting continuous multi-selection, which greatly improves the efficiency of batch operations.
import { MxFun } from "mxdraw";

// Enable grip editing system variable
MxFun.setIniset({
    /**
     *Enable grip editing
     *true, 1 means enabled, 0, false means disabled, 2 means only display grips but not respond to grip editing.
     */
    EnableGripEdit: true,
    /** Enable multi-selection and window selection functions, the default value is false */
    multipleSelect: true,
    /**
     * Enable multi-selection
     * Selection mode control 1: multi-selection, does not support continuous multi-selection for the time being, 2: multi-selection and supports continuous multi-selection, the default value is 1
     */
    IntelliSelectType: 2
});
In addition, the mxcad object also has relevant selection attribute configuration items, and users can also directly enable selection settings in the mxcad object:
import { createMxCad } from "mxcad";
createMxCad({
    //...
    enableIntelliSelect:true,// Whether to enable the selection function, enabled by default
    multipleSelect: true, // Enable multi-selection
    //...
  })
2. The Art of Selection: From Interaction to Filtering
In actual development, building a selection set usually has two completely different paths:
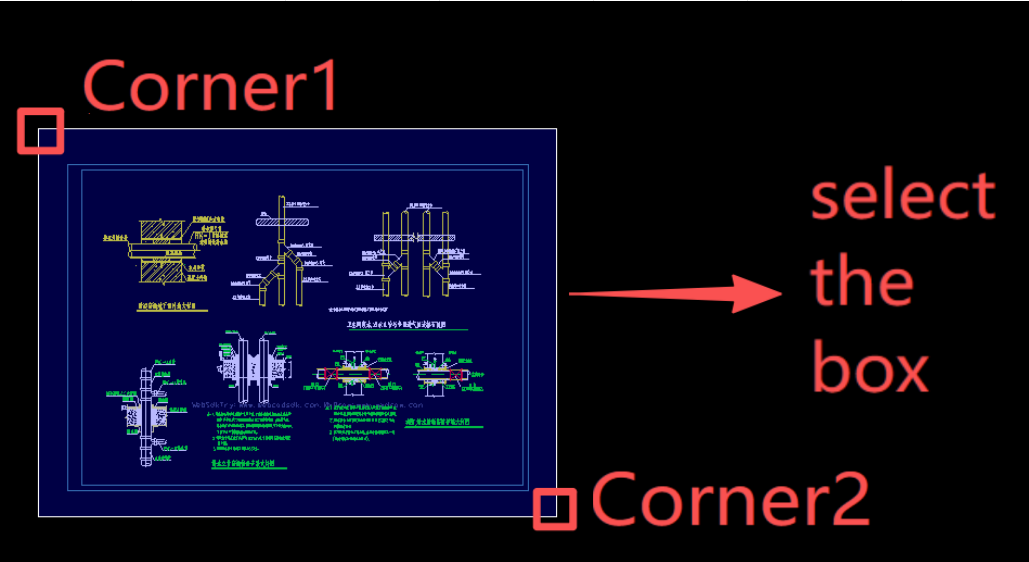
Interactive Selection: This is the most intuitive way. According to user needs, we can guide users to perform "point selection" (precision targeting), "window selection" (area coverage), "cumulative selection" (hold Shift to add one by one), or "select all". This method relies on the user's mouse operations, and MxCAD has encapsulated complete logic internally; developers only need to call the corresponding command interfaces.
For details on the implementation of selection methods, please refer to Selecting Graphics in the mxcad development documentation.
Building Filters (Advanced Application): When business logic needs to automatically filter specific objects (for example: automatically select all circles in a drawing), interactive selection is ineffective. At this time, we need to use
MxCADResbuf. By building a filter, we can accurately filter entities according to their types (such asMcDbText, McDbMText), layers, colors, or extended data. This is like executing a SQL query in a database, allowing the code to find targets for you automatically, which is the cornerstone of realizing automated batch processing. ts
tsimport { MxCADResbuf, MxCpp, MxCADSelectionSet } from "mxcad"; const mxcad = MxCpp.getCurrentMxCAD(); // Create filter const filter = new MxCADResbuf(); filter.AddMcDbEntityTypes("TEXT,MTEXT"); // Set selection set to filter text objects let ss = new MxCADSelectionSet(); ss.allSelect(filter); ss.forEach((id) => { mxcad.addCurrentSelect(id) }); mxcad.updateDisplay();
II. Geometric Transformation: From Intuitive Operation to Mathematical Essence
Once the target entity is locked, we enter the core link of editing - geometric transformation. In the underlying world of CAD, all movement, rotation, and scaling are essentially mathematical operations on the vertex coordinates of entities.
1. Core Engine: Transformation Matrix
In MxCAD's underlying logic, everything is a matrix. All complex transformations are uniformly matrix multiplication mathematically. By constructing a McGeMatrix3d transformation matrix, we can describe any spatial transformation.
The ingenuity of this design lies in efficiency. You can combine multiple transformations (such as rotating 45 degrees first, then moving 100 units, and finally scaling down by half) into a single matrix. Apply it all at once through the entity.transformBy(matrix) interface, and the coordinates of the entity will complete all calculations in an instant, avoiding the performance loss of multiple cycles of calculating vertices.
2. Two Realms of Common Operations
Although the underlying layer is a matrix, for the convenience of development, MxCAD provides developers with two implementation levels: "shortcut methods" and "matrix transformation".
Movement: Intuitively, we define a displacement vector and add this vector to the coordinates of all points of the entity. The shortcut is
move(basePoint, toPoint), which directly defines the start and end points; at the underlying level, a translation matrix is generated throughMcGeMatrix3d.setToTranslation(vector).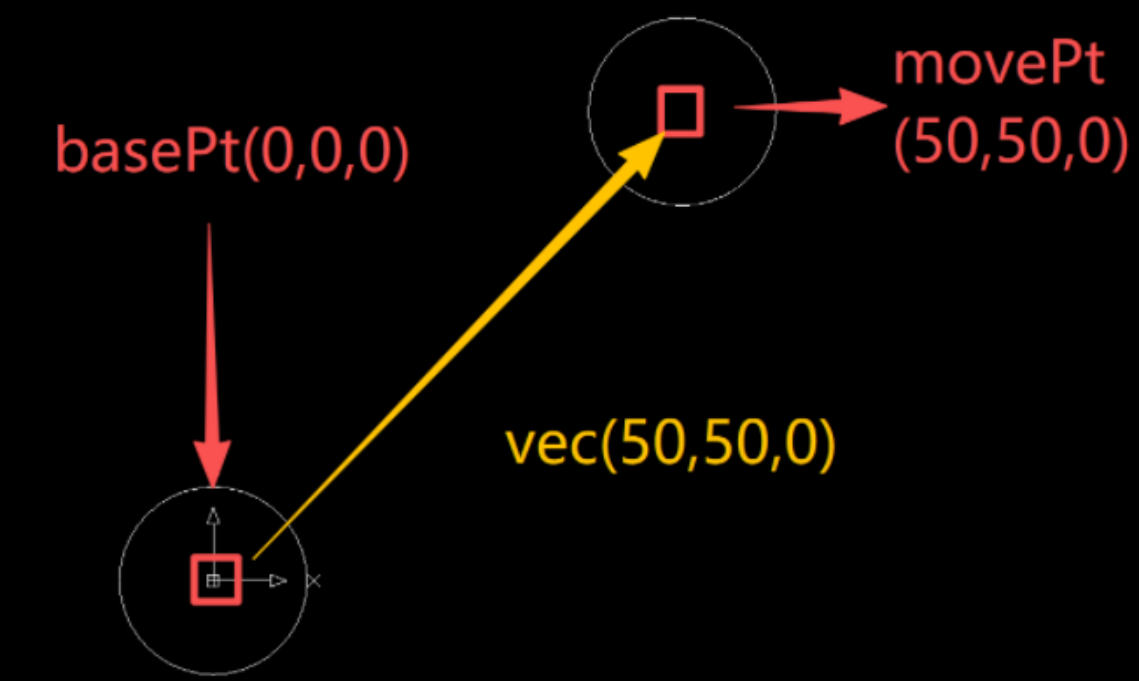 ts
tsimport { McDbCircle, McGeVector3d, MxCpp, McGePoint3d, McGeMatrix3d } from "mxcad"; const mxcad = MxCpp.getCurrentMxCAD(); const center = new McGePoint3d(0,0,0) const circle = new McDbCircle(center.x,center.y,center.z,10); // Before moving mxcad.drawEntity(circle); // Method 1: Call the translation function move directly const movePt = new McGeVector3d(50,50,0); circle.move(center,movePt); // Method 2: Call the translation matrix const matrix = new McGeMatrix3d(); const vec = new McGeVector3d(50,50,0) matrix.setToTranslation(vec); circle.transformBy(matrix); // After moving mxcad.drawEntity(circle); mxcad.updateDisplay();Rotation: Rotation requires three key elements: rotation base point, rotation axis, and rotation angle. Points on the entity will rotate around the specified axis by the specified radian. The shortcut
rotate(basePoint, dRotationAngle)allows you to ignore complex trigonometric function calculations; while the matrix methodMcGeMatrix3d.setToRotation(angle, axis, center)gives you absolute control over spatial rotation.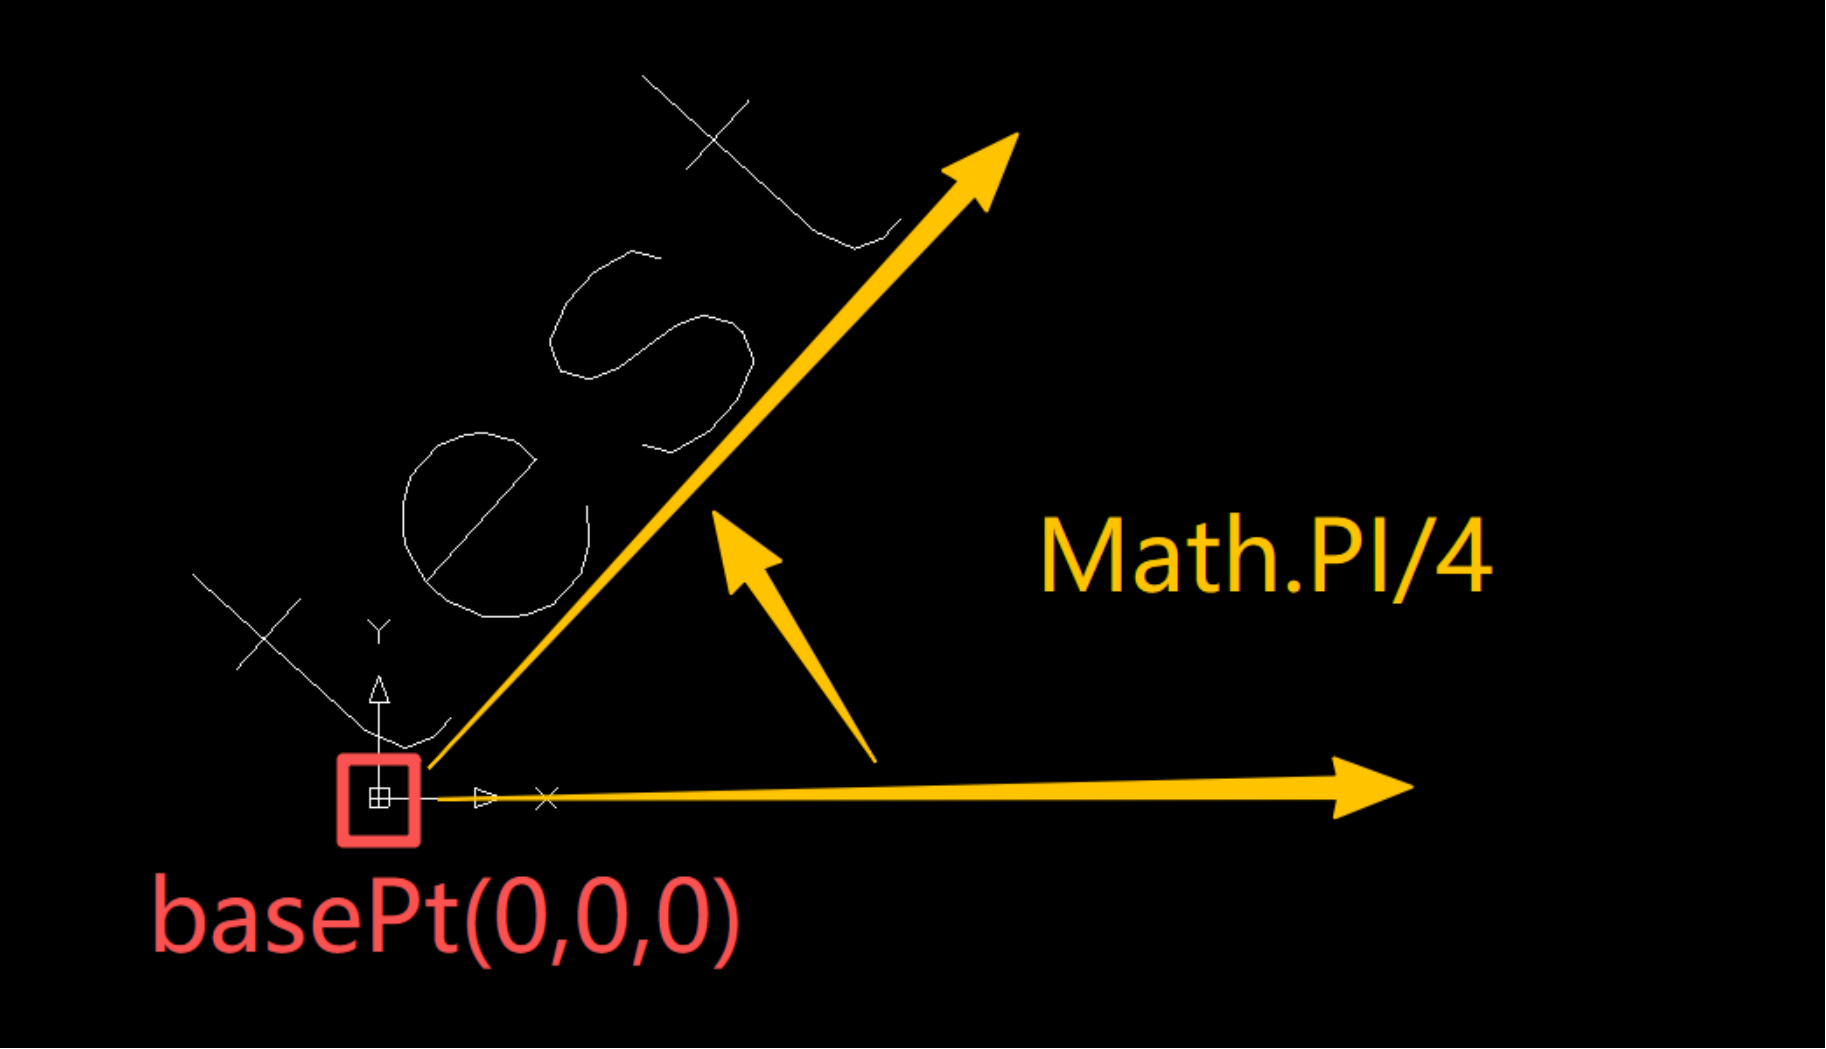 ts
tsimport { McDb, McGeVector3d, MxCpp, McGePoint3d, McGeMatrix3d } from "mxcad"; const mxcad = MxCpp.getCurrentMxCAD(); const basePt = new McGePoint3d(0,0,0) // Before rotation const id = mxcad.drawText(0,0,'test',10,0, McDb.TextHorzMode.kTextLeft, McDb.TextVertMode.kTextBottom); const text = id.getMcDbEntity(); const angle = Math.PI/4; // Method 1: Call the rotation function rotate directly text.rotate(basePt,angle); // Method 2: Call the rotation matrix const matrix = new McGeMatrix3d(); matrix.setToRotation(angle,McGeVector3d.kZAxis,basePt); text.transformBy(matrix); mxcad.updateDisplay();Scaling: Scaling is performed relative to a base point. New coordinates = base point + (old coordinates - base point) × scale factor. Whether using the convenient interface
scaleEntity(basePoint, dScaleFactor)or the matrixMcGeMatrix3d.setToScaling(scaleAll, center), the core lies in the selection of the base point - it determines whether the graphic is "shrunk in place" or "flies out of the screen".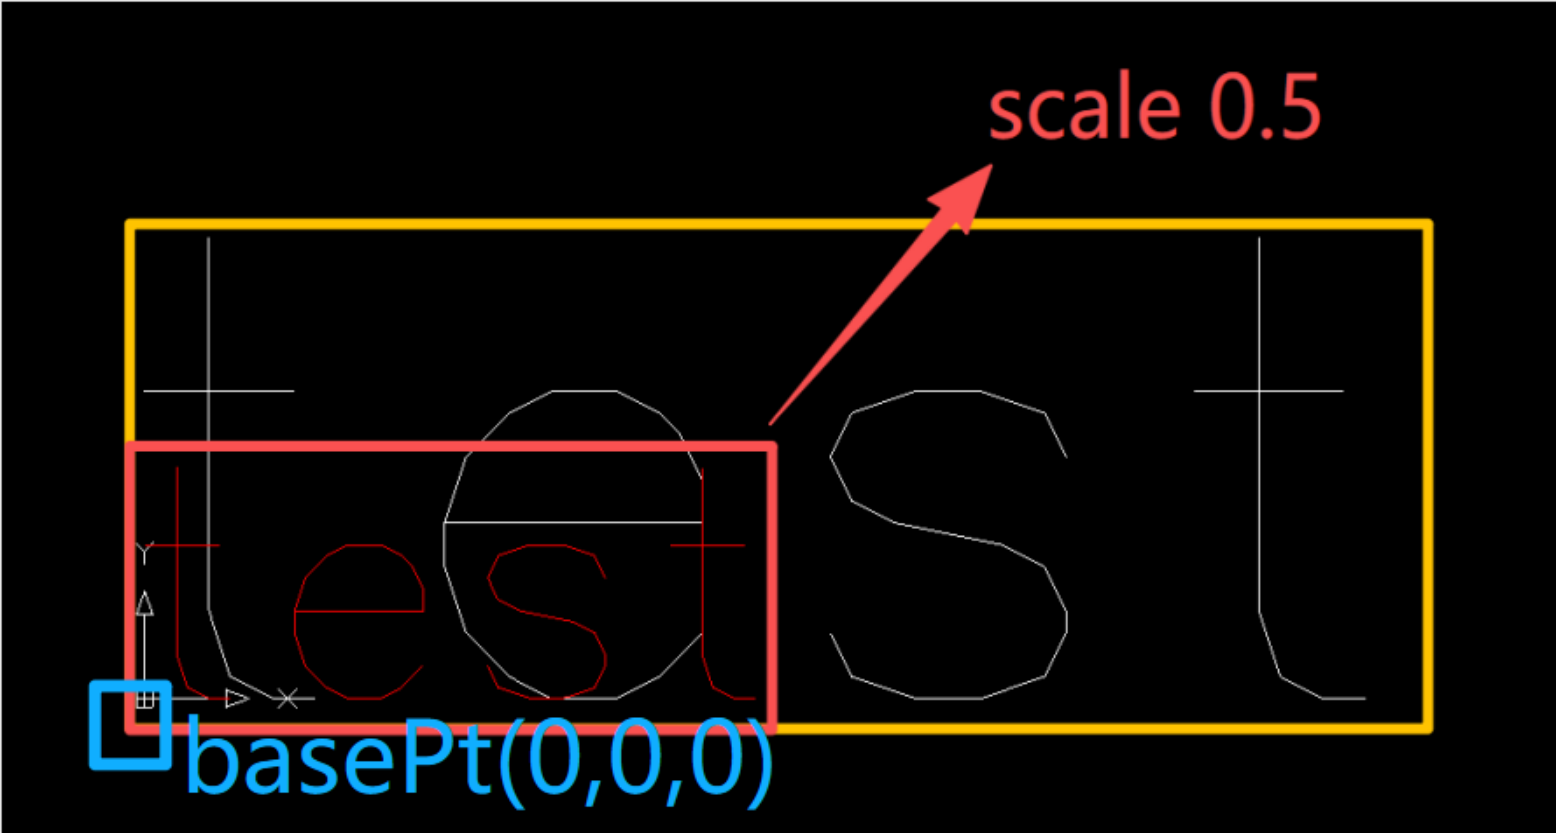 ts
tsimport { McDb, McCmColor, MxCpp, McGePoint3d, McGeMatrix3d } from "mxcad"; const mxcad = MxCpp.getCurrentMxCAD(); const basePt = new McGePoint3d(0,0,0) // Before rotation const id = mxcad.drawText(0,0,'test',10,0, McDb.TextHorzMode.kTextLeft, McDb.TextVertMode.kTextBottom); const text = id.getMcDbEntity(); // Method 1: Call the scaling function scaleEntity directly text.scaleEntity(basePt,0.5); // Method 2: Call the scaling matrix const matrix = new McGeMatrix3d(); matrix.setToScaling(0.5,basePt); text.transformBy(matrix); text.trueColor = new McCmColor(255,0,0) mxcad.updateDisplay();
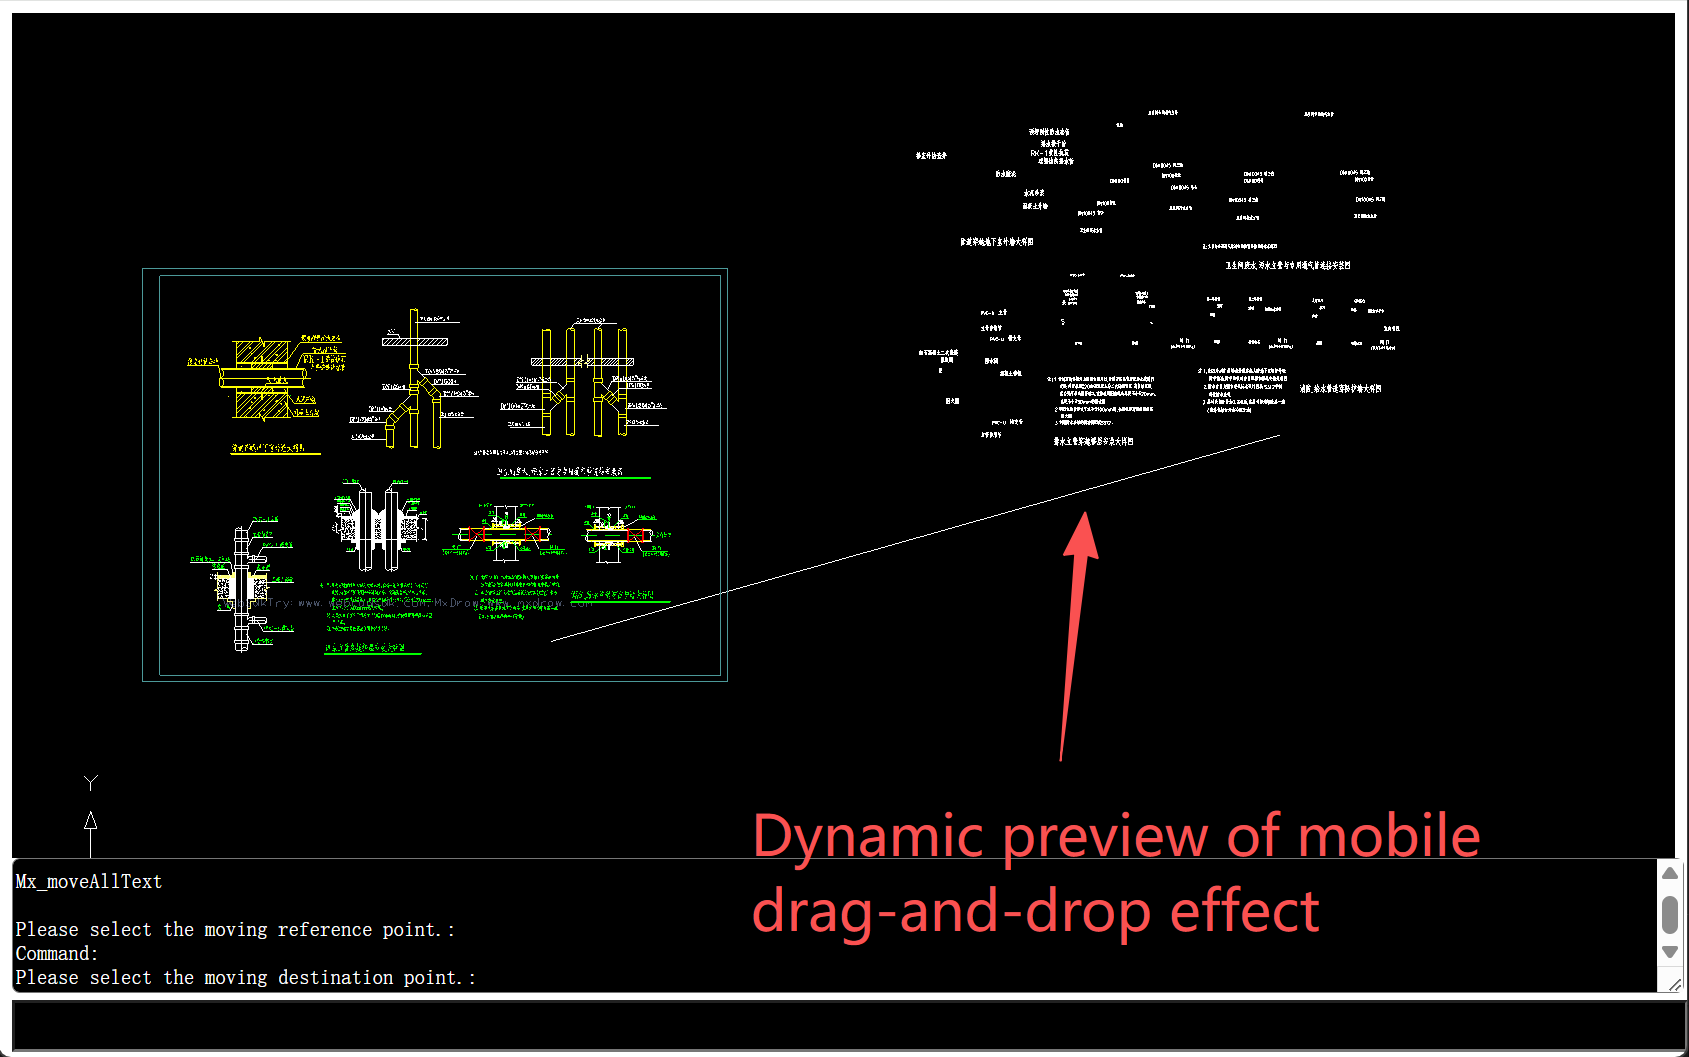
III. Comprehensive Practical Combat: Batch Text Movement with Dynamic Preview
To connect selection, filtering, transformation, and interactive experience, we implement a core scenario: batch move all text in the drawing with drag-and-drop preview support.
This case introduces the setUserDraw callback of MxCADUiPrPoint to achieve a "what you see is what you get" interactive effect.
Core Logic Flow
- Precise Filtering: Use
MxCADResbufto build a filter forTEXTandMTEXT, and obtain all target entities in the drawing throughMxCADSelectionSet. - Base Point Locking: Use
MxCADUiPrPointto get the movement base point specified by the user. - Dynamic Preview: During mouse movement, real-time clone and draw the "phantom" of the text through
setUserDrawto provide visual feedback. - Execute Transformation: After the user confirms the target point, apply the real
movetransformation to the original entity and refresh the view.
Code Implementation
import { MxCADSelectionSet, MxCADResbuf, MxCADUiPrPoint, McDbEntity, MxCpp, McDbLine } from "mxcad"
import { MxFun } from "mxdraw";

async function Mx_moveAllText() {
    const mxcad = MxCpp.getCurrentMxCAD();

    // 1. Build filter: only filter TEXT and MTEXT
    const filter = new MxCADResbuf();
    filter.AddMcDbEntityTypes("TEXT,MTEXT");

    // 2. Get selection set and cache entities
    const ss = new MxCADSelectionSet();
    ss.allSelect(filter);

    const entities: McDbEntity[] = [];
    ss.forEach(id => {
        mxcad.addCurrentSelect(id); // Highlight display
        const text = id.getMcDbEntity();
        if (text) entities.push(text);
    })

    // 3. Interaction: Get base point
    const getPoint = new MxCADUiPrPoint();
    getPoint.setMessage("Please select the base point for movement");
    const basePt = await getPoint.go();
    if (!basePt) return;

    // 4. Core: Dynamic Preview (UserDraw)
    getPoint.setMessage("Please select the end point for movement");
    getPoint.setUserDraw((pt, pw) => {
        // Draw auxiliary line
        pw.drawMcDbEntity(new McDbLine(basePt, pt));

        // Clone entity and draw "phantom"
        entities.forEach(text => {
            const _text = text.clone() as McDbEntity;
            _text.move(basePt, pt); // Only move the clone
            pw.drawMcDbEntity(_text);
        })
    });

    // 5. Confirm target point and execute real transformation
    const movePt = await getPoint.go();
    if (!movePt) return;

    entities.forEach(text => {
        text.move(basePt, movePt);
    });

    mxcad.clearMxCurrentSelect();
    mxcad.updateDisplay();
}

MxFun.addCommand("Mx_moveAllText", Mx_moveAllText);
IV. Summary and Advanced Thinking
Through the in-depth analysis in this article, we have not only mastered the specific techniques of MxCAD graphic editing, but also understood the mathematical principles behind it.
- Selection mechanism is the entrance. Using
MxCADSelectionSetand filters, we have achieved a leap from "humans finding drawings" to "code finding drawings". In particular, the ability to build filters is the key to realizing automated scripts. - Transformation principle is the core. Deeply understanding matrix-based geometric transformations allows us to understand the logic behind shortcut methods. Although shortcut methods (such as
move,rotate) are sufficient for daily development, directly operating matrices is the highest level of efficiency when dealing with complex composite transformations. - Grip interaction is the soul of user experience. Analyzing the CAD-specific grip editing process (i.e., the closed loop of "acquire - drag - update") can make our applications have a smooth interactive experience like native CAD.
In future development, when you face complex graphic editing needs, you might as well return to the origin: no matter how cool the effect is, it ultimately boils down to matrix operations on coordinate points. Mastering this point means you have mastered the ultimate code for controlling CAD graphics.